Archived Blog Posts
How to Prepare for Storms
9/12/2023 (Permalink)
Storms can be unpredictable and have the potential to disrupt our lives and put our safety at risk. That's why it's crucial to have a well-thought-out family emergency plan in place to ensure the safety and well-being of your loved ones. In this blog post, we will discuss the steps to create a comprehensive family emergency plan that can be applied to any storm scenario.
Assess Your Risks
The first step in creating a family emergency plan is to assess the risks specific to your area. Different locations are prone to different types of storms, such as hurricanes, tornadoes, or blizzards. Research the common types of storms that affect your region and consider the potential risks, including flooding, power outages, or evacuation orders. Understanding the risks will help you tailor your emergency plan to address the specific challenges you might face.
Communication Plan
Establishing a communication plan is crucial during storms when power outages or disrupted communication networks can occur. Make sure each family member knows the emergency contacts, including phone numbers of relatives, neighbors, and out-of-state contacts who can serve as a point of contact. Consider creating a group text or using a messaging app to stay connected. Also, determine a meeting place in case you are separated and unable to communicate.
Emergency Supplies
Stocking up on emergency supplies is important before any storm strikes. Create an emergency kit that includes essential items such as non-perishable food, water, flashlights, batteries, a first aid kit, and necessary medications. Keep this kit in a designated, easily accessible area of your home. Additionally, consider having a battery-powered or hand-cranked radio to stay informed about weather updates and any official instructions.
Evacuation Plan
In some situations, evacuation may be necessary. Research the evacuation routes in your area and familiarize yourself with them beforehand. Discuss with your family where you will go if you need to evacuate, whether it's staying with relatives, in a hotel, or at a designated emergency shelter. Plan for transportation and be aware of any evacuation orders or recommendations issued by local authorities.
Home Safety Measures
Prepare your home for storms by taking appropriate safety measures. Trim trees and remove any dead branches or trees that could potentially fall and cause damage. Secure outdoor furniture or objects that could become projectiles in high winds. Consider installing storm shutters or reinforcing windows to protect against strong winds. If you live in a flood-prone area, elevate valuable belongings or consider investing in sandbags to prevent water damage.
Emergency Information and Resources
Stay informed about storm alerts, weather updates, and emergency instructions from local authorities. Sign up for emergency alerts and follow reliable sources of information such as local news channels, weather apps, or the National Weather Service. Familiarize yourself with emergency resources in your area, including shelters, evacuation routes, and disaster assistance programs.
Practice and Review
Once your family emergency plan is in place, it's important to practice and review it regularly. Conduct drills to ensure that everyone knows their roles and is familiar with the plan. Update contact information, emergency supplies, and evacuation routes as needed. Periodically review and discuss your family emergency plan to address any changes in circumstances or new information.
Creating a comprehensive family emergency plan is essential to ensure the safety and well-being of your loved ones during any storm scenario. Assessing the risks, establishing a communication plan, stocking up on emergency supplies, having an evacuation plan, implementing home safety measures, and staying informed are all crucial elements of a well-prepared emergency plan. By following these steps and regularly practicing your plan, you can better protect your family and navigate through storm situations with confidence and resilience.
How to Create an Office Fire Escape Plan: Ensuring Workplace Safety
8/10/2023 (Permalink)
In any workplace, it is crucial to prioritize the safety of employees in the event of an emergency, such as a fire. Having a well-thought-out fire escape plan is essential to ensure the swift and safe evacuation of everyone in the office. In this blog post, we will guide you through the steps of creating an effective office fire escape plan to protect your employees and your business.
Assess the Office Layout
Start by thoroughly assessing the layout of your office space. Identify all possible exit routes, including doors, staircases, emergency exits, and windows. Take note of any potential obstacles or hazards that may impede the evacuation process, such as cluttered areas, furniture placements, or narrow pathways.
Designate one or more assembly points outside the office building where employees can gather and be accounted for after evacuating. Choose a location that is a safe distance away from the building and easily identifiable. Make sure the assembly points are communicated clearly in the fire escape plan and easily accessible for all employees.
Establish an Emergency Communication System
Set up an emergency communication system to effectively alert employees in case of a fire. This system could include fire alarms, intercoms, and megaphones installed throughout the office. Ensure that all employees are educated on recognizing the alarm signals and understand the appropriate response when they hear them.
Identify key personnel who will have specific roles and responsibilities during an evacuation. This may include floor wardens, marshals, or other designated individuals who will assist in guiding employees to safety. Clearly communicate these roles and responsibilities to the designated individuals and provide them with appropriate training, if necessary.
Educate and Train Employees
An effective fire escape plan is only as good as the people who understand and follow it. Conduct regular training sessions for all employees to familiarize them with the office fire escape plan. Review evacuation procedures, emergency exit routes, and safe practices during an evacuation. Provide employees with instructions on how to respond in different scenarios, such as evacuating through smoke-filled areas or assisting individuals with mobility issues.
Place clear and visible signage throughout the office that indicates evacuation routes, emergency exits, and assembly points. Ensure that these signs are strategically placed and easily understandable, even in high-stress situations. Regularly inspect and maintain these signs to ensure their visibility and accuracy.
Conduct Regular Drills
Practice makes perfect, and this is especially true when it comes to emergency situations. Conduct regular fire drills to test the effectiveness of your office fire escape plan and employees' understanding of their roles and responsibilities. During these drills, observe and provide feedback on their performance, offering any necessary guidance for improvement.
As your office layout or workforce changes, revisit and update your fire escape plan accordingly. Regularly review and evaluate the effectiveness of the plan, taking into account any feedback or incidents that may have occurred. Make adjustments as necessary to ensure that the plan remains up-to-date and aligned with best practices for workplace safety.
Communicate the Fire Escape Plan
Ensure that every employee is aware of the office fire escape plan by communicating it clearly and regularly. Conduct orientation sessions for new employees, provide written materials outlining the plan, and include it as part of your employee handbook. Foster a culture of safety and encourage open communication so that employees feel comfortable asking questions or seeking clarification about the fire escape plan.
Collaborate with the local fire department or emergency services to review your office fire escape plan. They can provide additional guidance and recommendations based on their expertise and experience. Their insights can help you refine and improve your plan, ensuring that it meets all safety requirements and is aligned with local regulations.
Creating an office fire escape plan is a critical step in ensuring the safety and well-being of your employees in the event of a fire. By following these steps and regularly reviewing and practicing your plan, your workplace will be better prepared to respond effectively in case of an emergency. Remember, a well-prepared workforce is your best defense against fire hazards, and investing in their safety should always be a top priority.
Water Dripping from Light Fixtures: Causes, Risks, and Solutions
7/27/2023 (Permalink)
Water dripping from light fixtures can be a perplexing and potentially hazardous situation for homeowners. Not only does it pose a risk to your electrical system, but it also indicates an underlying issue that requires prompt attention. In this blog post, we will explore the possible causes of water dripping from light fixtures and provide actionable solutions to address the problem effectively.
Identify the Source
The first step in dealing with water dripping from light fixtures is to determine the source of the water. It could be due to various factors, including:
- Plumbing Leaks: A leaky pipe or plumbing fixture above the light fixture can cause water to seep through and drip onto the light.
- Roof Leaks: If your light fixture is located near the ceiling or on the top floor, a roof leak could be the culprit.
- Condensation: In some cases, condensation can form on pipes or HVAC ducts, leading to moisture accumulation and eventual dripping onto the light fixture.
Immediate Actions
If you notice water dripping from your light fixtures, take these immediate actions to mitigate any potential risks:
- Turn off the Power: As a safety precaution, turn off the electricity supply to the affected area from the circuit breaker.
- Place a Bucket or Container: Position a bucket or container under the light fixture to collect the dripping water and prevent further damage.
Addressing Plumbing Leaks
If the water source is identified as a plumbing leak, follow these steps:
- Call a Professional Plumber: It's essential to seek the assistance of a licensed plumber who can accurately locate and repair the leak to prevent further water damage.
- Temporary Measures: Until the plumber arrives, consider using temporary solutions like shutting off the water supply to the affected area or placing a bucket beneath the leak.
Dealing with Roof Leaks
If the water is entering through the roof, follow these guidelines:
- Contact a Roofing Professional: Engage a qualified roofing contractor to inspect and repair any roof leaks promptly.
- Mitigate Interior Damage: In the meantime, protect your home by covering furniture and floors with tarps or plastic sheets to prevent further water damage.
Managing Condensation Issues
In case condensation is the root cause, take these steps to address the problem:
- Insulate Pipes and Ducts: Apply insulation to pipes and HVAC ducts to prevent condensation from forming and dripping onto the light fixture.
- Improve Ventilation: Ensure proper airflow in your home by using exhaust fans, opening windows, or installing a dehumidifier to minimize excess moisture.
Water dripping from light fixtures demands swift action to safeguard your home and prevent potential electrical hazards. By identifying the source and following the appropriate steps, you can address the issue effectively. However, it is crucial to consult professionals for complex repairs and to ensure long-term solutions. Remember, timely intervention will not only protect your home but also provide peace of mind.
Understanding the Dangers of Flood Water: Why is it Referred to as 'Black Water'?
6/15/2023 (Permalink)
 Flood water is considered "black water" because of the various contaminants it can contain.
Black water is a term used to describe water that is contaminated with harmful substances, including bacteria, viruses, and other pathogens. It is typically associated with sewage backups, flooding from rivers and streams, and water from the ocean or other bodies of water that contain high levels of contaminants.
Why is flood water considered black water?
Flood water is considered "black water" because it often contains a variety of contaminants, including sewage, chemicals, and other hazardous materials. When flood water enters a building, it can quickly spread and contaminate anything it comes into contact with, including walls, floors, furniture, and personal belongings.
Health Risks Associated with Black Water
Exposure to black water can pose serious risks. It can also lead to the growth of mold and other harmful bacteria, which can cause long-term problems if not properly addressed.
Mitigating Black Water Damage
Due to the potential risks associated with black water, it is crucial to take immediate action if your property has been affected by flood water. It is best to seek the services of a professional restoration company that specializes in black water damage cleanup and restoration. They have the necessary equipment, knowledge, and expertise to safely and effectively mitigate the damage and restore your property to its preloss condition.
Preventing Black Water Damage
While it is impossible to completely prevent flooding and black water damage, there are steps you can take to minimize the risk. These include:
- Regularly inspecting and maintaining your property's plumbing and drainage systems.
- Ensuring that gutters and downspouts are properly installed and functioning.
- Elevating appliances and electrical systems above potential flood levels.
- Keeping valuable items and important documents in waterproof containers.
In conclusion, flood water is considered "black water" because of the various contaminants it can contain, including sewage, chemicals, and other hazardous materials. Exposure to black water can pose serious risks, and it is important to seek professional restoration services if your property has been affected by flood water. Additionally, taking preventative measures can help minimize the risk of black water damage to your property.
What Does Black Mold Look Like? A Comprehensive Guide
5/23/2023 (Permalink)
Mold is a common issue in many households. Among the various types of mold that can grow in homes, black mold is often considered the most concerning due to its potential toxicity. But what exactly does black mold look like? In this comprehensive guide, we will explore the appearance of black mold, its characteristics, and what you should do if you suspect it in your home.
Identification of Black Mold
Black mold, also known as Stachybotrys chartarum, is a type of fungus that can grow indoors under certain conditions. It typically thrives in damp and humid environments, such as bathrooms, basements, and areas with water damage. Identifying black mold can be challenging, as its appearance can vary depending on the stage of growth and the surface it is growing on. Here are some common characteristics of black mold:
Color
Despite its name, black mold may not always appear completely black. It can range in color from dark green to grayish-black or even slimy brownish-black. The color may also appear patchy or streaky.
Texture
Black mold can have a slimy or fuzzy texture. When it is in the early stages of growth, it may appear as small, black specks that gradually grow into a larger patch.
Shape
Black mold can have a variety of shapes. It can appear as irregular spots or patches, or it can grow in a powdery or velvety texture. It may also have a distinctively slimy appearance.
Location
Black mold is often found in areas with moisture or water damage, such as walls, ceilings, carpets, and other porous materials. It may also grow on wood, paper, and other organic materials.
Smell
Black mold has a strong, musty odor. If you notice a persistent musty smell in a certain area of your home, it may indicate the presence of black mold.
What to Do If You Suspect Black Mold in Your Home
If you suspect black mold in your home, it's crucial to take action to address the issue as soon as possible. Avoid touching or disturbing the mold. Black mold can release spores when disturbed, which can increase the risk of inhalation. Avoid touching or disturbing the mold, and do not attempt to clean it without proper protective gear.
Assess the extent of the mold growth
If you notice a small patch of mold, you may be able to clean it yourself using appropriate precautions. However, if the mold growth is extensive, covering a large area or has been present for a long time, it's best to seek professional help from a qualified mold remediation specialist. They have the expertise and equipment to safely handle and remove mold.
Properly clean and remove the mold
If you decide to clean the mold yourself, it's important to use appropriate cleaning methods. Avoid using bleach or other harsh chemicals, as they may not effectively kill mold spores and can release harmful fumes. Instead, use mild detergent and water, or specialized mold cleaning products. It's also important to properly dispose of any materials contaminated with mold, such as carpets or drywall, following local regulations.
Prevent future mold growth
Once the mold has been removed, take steps to prevent future mold growth. Keep your home well-ventilated, fix any leaks promptly, and maintain appropriate humidity levels. Regularly inspect areas prone to mold growth, such as bathrooms, basements, and crawl spaces, and address any issues promptly.
If you suspect the presence of black mold in your home, it's essential to take appropriate precautions, assess the extent of the mold growth, and seek professional help if needed. Proper identification, remediation, and prevention of mold growth can help ensure a healthy and safe living environment for you and your family.
Fire Prevention in the Kitchen: Essential Cooking Tips to Reduce Hazards
4/28/2023 (Permalink)
Cooking is an everyday activity that most of us engage in without thinking about the potential hazards. However, it is essential to be aware of the risks involved, especially when it comes to fire. A grease fire is a common kitchen hazard that can quickly escalate into a full-blown fire if not handled correctly. In this article, we will discuss some essential cooking tips to reduce the risk of fire in your kitchen.
Keep the cooking area clean
A clean kitchen is the first line of defense against fires. Grease buildup on surfaces and appliances can ignite and cause a fire. Therefore, it is important to clean your cooking area before and after each use. Make sure to wipe down the stove and oven, countertops, and any other surfaces that may have come into contact with grease or oil.
Never leave cooking unattended
One of the most common causes of kitchen fires is leaving cooking unattended. It is essential to keep a close eye on the food you are cooking and to never leave it unattended, especially if you are frying food. If you must leave the kitchen for any reason, turn off the stove or oven, or ask someone to keep an eye on the food for you.
Keep flammable objects away from the stove
Flammable objects such as kitchen towels, curtains, and even loose clothing should be kept away from the stove. If these objects come into contact with a hot surface or an open flame, they can quickly catch fire.
Don't overheat oil
Overheating oil is a common mistake that can lead to a grease fire. When oil reaches its smoke point, it can catch fire. Therefore, it is important to never overheat oil when cooking. If you notice the oil smoking, turn down the heat or remove the pan from the heat source.
Use the right type of oil
Different oils have different smoke points, which is the temperature at which they begin to smoke and can catch fire. When cooking, it is essential to use the right type of oil for the job. For high-heat cooking such as frying, it is best to use oils with a high smoke point, such as peanut or canola oil.
Keep a fire extinguisher nearby
Despite your best efforts to prevent fires, accidents can still happen. It is essential to keep a fire extinguisher in the kitchen and to know how to use it. Make sure the extinguisher is rated for kitchen fires, and that everyone in the household knows where it is located.
In conclusion, cooking is an essential part of our daily lives, but it is important to take precautions to prevent fires. By following these essential cooking tips, you can reduce the risk of fire in your kitchen and keep your home and family safe. Remember, a little bit of prevention can go a long way in avoiding disaster.
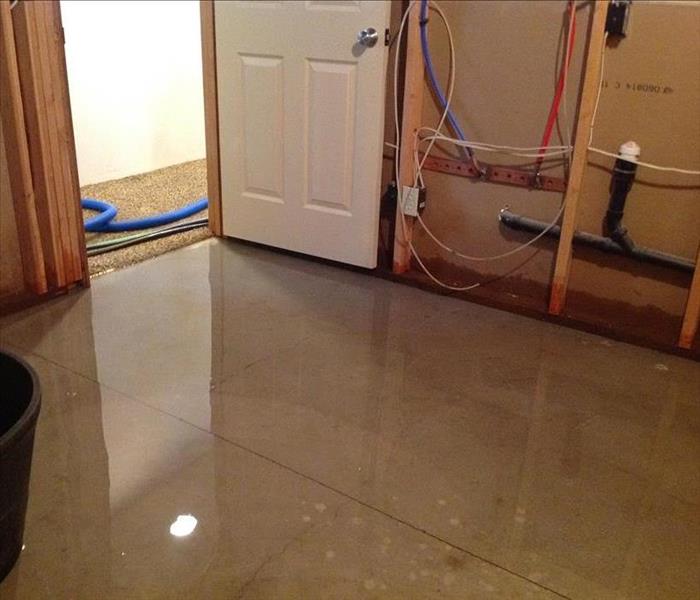
What do I do if my basement floods?
3/18/2023 (Permalink)
 Flooded basement can leave you feeling hopeless, give SERVPRO a call today!
The last thing you want is to wake up one morning and find your home flooded. Rain-driven water can do massive amounts of damage, not only to your basement but also throughout the structure. That's why it's important to know what steps to take if this happens to you. Here is what you need to know about dealing with flooding.
Repair Replacement
If your basement has been flooded, your insurer will cover the cost of repair or replacement as well as any other damage that occurred because of flooding.
In order to make sure you're covered in case of a flood, talk to your insurance agent about adding a rider to your policy. A rider is something added onto an existing contract and can vary depending on how much coverage you want or need.
Flood Coverage
You can also lower your premium by making a few simple changes to your policy. For example, adding flood and wind coverage to your current homeowner's insurance policy could bring down the cost of your monthly premiums or even make them go away entirely. Another way to save money is by installing flood sensors in areas where flooding is likely, like basements and garages and then informing your insurance company about them so they know how much water damage has been prevented.
If you're willing to make some investments in preparation for disasters, there are additional discounts available for things like backup generators or batteries which can keep power flowing after an outage. Elevated pump systems help prevent basement flooding, and other mitigation measures such as sandbags or sump pumps that can help protect against rising floodwaters.
If you are willing to invest in these mitigation measures, some insurers offer discounts on premiums if you are willing to install an elevated pump system or other mitigation measures like backup generators and batteries. Avoiding this type of loss is important because it can cost thousands or even tens of thousands of dollars in repairs and replacements.
Prevent Basement flooding
The first step to avoiding water damage is to make sure that your basement is properly sealed. If you have a cracked foundation, then you should have it repaired immediately by a contractor who specializes in repairing foundations.
It is also important to keep an eye on the outside of your home for signs of water infiltration, such as muddy footprints around doors or windowsills. If you see any evidence of this at all, call an expert immediately!
If your basement has been flooded, your insurer will cover the cost of repair or replacement as well as any other damage that occurred because of flooding. Call the professionals at SERVPRO for your basement water damage. We are available anytime day or night.
What To Do If My Roof Leaks
1/23/2023 (Permalink)
If your roof is leaking, you need to act fast. Not only will leaks damage your home and belongings, but they can also cause mold and mildew. It is important to call a professional cleanup and restoration company as quickly as possible after noticing a roof leak. Until the crew arrives, here are some things you can do.
Turn off electricity
If you have a leak, it's best to turn off your electricity. Turning off the electricity is important because electricity could cause an electric shock when trying to clean up water. Turning off the electricity will also prevent further damage until you can call a highly trained and experienced water cleanup professional.
Locate the source of the leak
It's important to determine where the water is coming from before you can fix it. To find sources of water in your home:
- Look for stains on ceilings or walls where there shouldn't be any (this could indicate a leak somewhere above)
- Feel around along cracks in ceilings and walls; if they feel slimy or wet, there might be moisture trapped in them (this could also indicate mold growth)
Contain the leaking water
If water is leaking through your roof, you'll need to act quickly. If the leak is minor, you might be able to contain it with a bucket or other container that can hold the amount of water coming down. This will help keep damage limited and prevent mold from developing on nearby surfaces like walls and floors.
If the leak is severe, however—or if it's too late to save your belongings—you'll want to call a professional as soon as possible. They have experience in fixing leaks and will know how best to approach this situation while protecting your home at all costs.
Remove any valuables
It's not just a matter of fixing the leak, you may also have to get rid of any valuables that may be damaged due to water. This is especially true if your valuables are not water resistant or waterproof or watertight, which means they can't handle being exposed to water for long periods of time. To prevent irreversible damage to your belongings, it is important to move your valuables to a safe location as quickly as possible after noticing a leak.
File an insurance claim
You should file an insurance claim with your insurance company. Documenting the damage is important, especially if there are multiple leaks or the damage is significant. Some restoration companies that you hire, such as SERVPRO, will also deal with the claims process for you.
Get it fixed right away
It can be scary to think about a leaky roof, but it’s important to stay calm and know that there are steps you can take to fix the problem. If your roof is leaking, make sure you get it fixed right away! Don't wait until the roof leaks again and don't try to fix it yourself. Disaster restoration companies, such as SERVPRO of Englewood/East Littleton are trained to handle the cleanup and restoration following a roof leak.
FAQ: Frozen Pipes and Insurance
1/18/2023 (Permalink)
 If you experience a burst pipe in your home or business, give SERVPRO of Englewood/East Littleton.
Winter can be a tough time for homeowners, especially if you have frozen pipes. There are a few ways to prevent burst pipes from happening, but sometimes they still happen. If your pipe bursts and causes damage inside your home, does the homeowner's insurance cover the cost of repairs? The answer is: it depends.
How do you prevent pipe-bursts?
The best way to prevent frozen pipes is by making sure that the temperature in your home doesn't drop below 55 degrees Fahrenheit at all times throughout the winter. You also need to consider how much water flows through each pipe and make sure you have enough insulation if it's exposed or above ground level.
Why do pipes burst?
When pipes burst from freezing temperatures, it's because they are unable to handle the pressure of expanding water. When water freezes, it expands. It doesn't have enough room to expand inside the pipe and will instead push on its walls until something gives way.
If your pipes burst in an unheated area of your home (like a basement), this causes a lot of damage as well: firstly because there's no insulation outside the walls or ceiling; secondly, because cold air tends to fall downwards and so if you're unlucky enough for your burst pipe to be in an unheated part of your house, it can cause serious damage underneath floors or other parts of your home.
When are frozen pipes covered?
Insurance companies will generally cover any damage from frozen pipes as long as it's considered "sudden and accidental." If a problem with your heating system causes a pipe to burst in your house while you’re away, it's likely covered by insurance.
If it is clear that the policyholder/property owner has neglected to protect their plumbing or other parts of their property, the insurance company might deny coverage.
What if I don't have insurance?
If you have no insurance and your home is damaged by a burst pipe, the cost of repairs can be significant. In this case, you may have to pay for repairs out of pocket.
If you have a frozen pipe, it's important to know that your homeowner's or renter's insurance might cover the damage. The key is to contact your insurer quickly after the pipe has burst, so they can assess the situation and determine if they'll help pay for repairs. If you're unsure about what type of policy you have with this company, ask them directly before making any decisions.
If you experience a burst pipe in your home or business, give SERVPRO of Englewood/East Littleton a call, and we will get your Englewood home back to normal as quickly as possible!
Top Three Signs Your Roof Has Hail Damage
12/5/2022 (Permalink)
Top 3 Signs of Roof Damage
If you live in the Englewood, CO area, you are probably familiar with hail. You need to be aware of the top three signs that your roof has been damaged by hail. The first sign is obvious: if there are chunks taken out of the shingles or siding on your house. But what about those soft spots and curled or buckled shingles? Those might not be as obvious to homeowners who aren't trained in construction or maintenance. That's why it's important to know what these signs look like so you can spot them right away if they happen around your home.
What Does Roof Hail Damage Look Like?
Hail damage is difficult to spot, especially if it's on the roof. Hailstones can be up to two inches in diameter, and they are made of ice that can range from softball size to baseball size. When these stones hit your home or car, they can cause significant damage.
As a homeowner, you want to be aware of this damage so that you know when it's time for repairs. Knowing what hail damage looks like can help you identify if your roof needs repairs or not.
#1: Granules Missing from Your Shingles
As you can see, the most obvious sign that your roof has hail damage is if you notice granules missing from your shingles. If these granules are gone, it means the shingle has been hit with such force that its integrity was compromised—a serious problem that could lead to leaky roofs or even water damage in your home.
#2: A Soft Spot On Your Roof
Soft spots on the surface of your roof can be caused by either water damage or impact from hail stones. Both of these conditions can lead to leaks and more serious damage, so it's important to get any soft spots identified as soon as possible.
How do I find soft spots? The first step in identifying whether there is a problem with your home's shingles is to inspect the outside of your house thoroughly. Look for areas where the shingles may have been damaged, such as cracks in areas surrounding nails or staples that hold down the shingles or missing pieces altogether (especially near vents). You should also check along eaves and overhangs since this is where rainwater tends to collect after storms—and where it may cause problems if not addressed quickly enough!
#3: Curled or Buckled Shingles.
The third and final sign of roof hail damage is curled or buckled shingles. Hail can cause your shingles to curl or buckle, which could lead to water seepage between the shingle layers. If you suspect that your roof has been damaged by hail, call a professional for help!
If your roof has been damaged call a professional for help.
If you notice that your roof has hail damage, don't try to fix it yourself. You'll only make things worse. Instead, hire a professional roofing contractor who can assess the damage and recommend the best course of action for repairing or replacing your roof. The sooner you get help from a professional company, the better off you will be in the long run because fixing issues like this before they become too big of an issue will save money in the long run.
If you notice any of these signs on your roof, call a professional to inspect and repair it. The last thing you want is for your roof to collapse during a storm! If you do find yourself catching the roof damage a little too late, with a house full of water, give SERVPRO of Englewood/East Littleton a call!
How to Prevent Pipes from Freezing
11/14/2022 (Permalink)
Keeping Pipes from Freezing: How to Avoid It
Winter is harsh and unforgiving. It's cold, it's wet, and if you're not careful, it can freeze your pipes. If you haven't already experienced this horror firsthand, chances are someone you know has!
Prepare For The Cold
To prevent pipes from freezing, you must prepare for the cold weather. In the winter months, you should turn down your thermostat to make sure it doesn't get too cold inside your home. Also, keep cabinet doors open to allow heat to circulate throughout your home and leave windows open when possible. It is also a good idea to leave a trickle of water running in the faucet so that it will never completely freeze over.
If you do have frozen pipes, there are several ways to thaw them. One way is to wrap the pipe with a towel or blanket and then turn on a hot water tap in your home. This will slowly warm up the frozen area, which can then be used for water again. The other method involves using a heat gun or hair dryer to warm up the area of your home where your pipes are located.
Let The Faucets Drip
You can prevent pipes from freezing by letting the water drip slowly. If your home has a faucet with a single-lever handle, turn it all the way open and let the water run into a bucket or another container. If your home has two shutoff valves (one for hot and one for cold), switch both levers to their off positions first, then take them off and allow any remaining water to drain out of each pipe before reconnecting them.
Once you've switched off your main valve, open cabinet doors under sinks so that if ice does indeed form inside a pipe, it is more likely to melt due to heat generated by running water at other locations within your house.
Leave Cabinet Doors Open
Leaving cabinet doors open allows you to keep the pipes from freezing. Make sure they are in a room that stays warm and not prone to moisture. If your crawl space has ventilation, make sure it’s clear of snow or ice so air can circulate.
If you have a crawl space that’s prone to moisture or flooding, it may be time to consider getting some help from a professional. They can install drainage systems, ventilation fans and other improvements that will keep your crawl space from becoming a dangerous place.
These Tips Will Help Prevent Frozen Pipes
Freezing pipes is a common problem in homes across the country. To keep it from happening to you, follow these tips:
- Make sure there’s a heat source in your home. If possible, have both an electrical heater (space heater) and a gas-powered one available to use during cold weather. Turn on the heater whenever you leave the house or go to bed at night, so it can warm up while you sleep.
- Use a humidifier that runs on electricity only during times when pipes may freeze up if they’re exposed to low humidity levels too long while they're turned off; this is especially important if your home doesn't have central heating or A/C systems installed yet (or if your home doesn't have any heating system at all).
So, there you have it—five tips to help your pipes from freezing during the winter. While these methods won’t always work, they will reduce the risk of your faucet or toilet freezing in extreme temperatures. If you take care of your home now, before frosty weather hits, then you’ll be prepared when temperatures drop and pipes freeze.
What Should I Do If My Roof Is Damage In a Fire?
10/7/2022 (Permalink)
What Do I Do If a Fire Damages My Roof?
A fire can be devastating to a home or business. It can cause damage to your property and belongings, as well as create a danger for people in the area. If you've had a fire at your home or business, here's what you should do:
Contacting the Professionals
- Contact SERVPRO of Englewood/East Littleton to assess your fire damage. Call (303) 777-6498.
- If you don’t have insurance, contact the Colorado Division of Insurance for assistance in finding a professional contractor to repair your damaged roof. You can reach them at (303) 777-6498.
- Take care not to damage any electrical wiring or other systems during repairs – consult an electrician before attempting any work on these systems yourself!
1) Contact the Fire Department
If your house catches fire, the first thing you should do is call the fire department. The fire department will assess the damage and determine if evacuation is necessary. If so, the fire department will help with evacuation and cleanup.
2) Contact Your Insurance Company
After you’re sure that your family and home are safe, the next step is to contact your insurance company. Call your agent or the claims department of the insurance company. Your insurance provider should have a 24/7 emergency hotline number available in case of emergencies like this one.
3) Contact SERVPRO of Englewood/East Littleton
SERVPRO of Englewood/East Littleton is a full-service restoration company that can provide 24/7 emergency water removal and fire cleanup services. If you have questions about your property, please don't hesitate to give us a call at (303) 777-6498 or fill out our online contact form.
4) Start Removal of Debris
Once you've determined that your roof is damaged from a fire, it's time to start removing debris. This can be done in several ways, depending on the severity of the damage.
- Remove any fallen and dangling portions of the roof that may pose an immediate threat to people or property.
- Remove any smoldering wood, which is still hot enough to catch fire again if ignited by embers or sparks from other sources.
- If there is evidence of water damage due to sprinkler systems or hoses used during extinguishment efforts, check for mold growth with a moisture meter before proceeding further with repairs.
Placing a tarp on a roof after a fire can keep out the elements and prevent further damage to your home or business.
A tarp can be used to help protect your home or business from further damage. After a fire, it's important to have roof repair done as soon as possible. A tarp can prevent further water damage and keep out the elements while you're waiting for repairs.
We hope this article has given you an idea of what to do after a fire. If you have any questions, or if you would like to speak to one of our restoration specialists about your own situation, please contact us at (303) 777-6498.
How Often Should You Clean Out Your Dryer Vent?
8/31/2022 (Permalink)
To avoid a lint fire in your clothes dryer, you must clean the lint filter after each use. The dryer vent should also be cleaned at least once a year to significantly reduce the risk of a dryer fire in your Greenwood Village, CO home.
Steps To Follow When Cleaning the Dryer Vent
It's important to mention that if you don't have a lot of mechanical ability or physical strength, you should have a professional do the job to avoid costly fire damage repairs.
- Unplug the dryer and carefully pull it away from the wall.
- There is a tube connecting your dryer with the dryer vent in the wall. Carefully disconnect the tube using a screwdriver. Different dryer models require different types of screwdrivers.
- Using your vacuum's nozzle attachment, vacuum out the vent carefully, going as far into the vent as you can. Thoroughly vacuum out the tube as well.
- Reattach all of the components and push the dryer back into place. Plug the dryer back into the wall socket.
Ways To Keep the Dryer Vent Clean
In addition to cleaning out the dryer vent each year, you can reduce the amount of dirt and lint that works its way into the vent by following a simple routine. This will also reduce the risk of a lint fire.
Keep the floor that surrounds the dryer clean. Sweep up lint and debris after each use.
Dryer sheets can coat the dryer vent, causing lint to build up more easily. You don't need to totally eliminate the use of dryer sheets, but try to limit using them on clothes that create the most static, such as wool socks and polyester materials.
Dry your clothes in the least amount of time needed to get them dry. Cycles of 30 to 40 minutes will allow for better air circulation than longer cycles.
Avoid a costly lint fire in your dryer by following these simple steps.
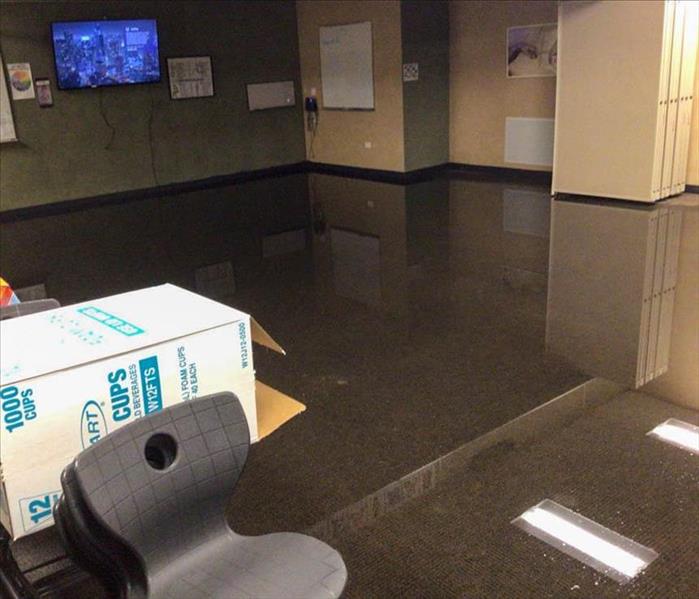
3 Steps To Categorize Water Damage
8/26/2022 (Permalink)
 Commercial water damage in Littleton, CO
3 Steps To Categorize Water Damage
Categorizing water damage is an important step toward evaluating the severity of damage and determining restoration requirements. Building owners and managers can get a clearer sense of the severity of water or sewer damage by considering three aspects of damage to a commercial building in Littleton, CO.
1. The Source of Water
Water damage from broken or leaking supply lines tends to be clean, Category One water damage. This water has often undergone treatment to reduce contaminants and pathogens.
Category Two water damage originates from an overflowing shower, appliance or toilet, but does not contain solid waste. Category Three water from a sewer backup or external flood is the most contaminated type of water damage.
2. Where Water Leaks Flow
Water flowing down between levels of a structure degrades in condition. Clean water from a pipe leak becomes Category Two damage on a lower floor. Water from a sewage company: flooded toilets can also degrade further.
Like sewer damage, leaks between floors call for disinfection. Tearing out porous materials such as ceilings, carpets, and drywall may be necessary to discourage mold.
3. How Long Water Is Left Sitting
Within 24 to 48 hours, Category One damage can turn into contaminated Category Two damage that requires disinfection and may necessitate tearing out porous building materials.
Mold may also multiply in the same span of time after damage. Visible growth may become detectable as soon as 48 to 72 hours after the damage takes place.
The source and flow of water are important for determining the severity of recent water damage. Ongoing or past damage may result in secondary damage, such as mold. Property owners and managers may be able to do more accurate preliminary assessments based on these three factors, but the opinion of a restoration company can be helpful for restoring water or sewer damage at a building in Littleton, CO.
Understanding the Costs of Mold Removal
8/10/2022 (Permalink)
 Mold restoration in Greenwood Village, CO
The Costs of Mold Removal
When a homeowner experiences a mold disaster, all they can see is dollar signs. Most insurers will not cover the costs of mold damage, especially if it stems from a preventable issue. Therefore, homeowners are left with little option but to call a mold removal company in Greenwood Village, CO. However, to be prepared, every homeowner should familiarize themselves with the stages of mold removal, so they can better understand the costs.
- Testing
- Mitigation
- Removal
- Restoration
Testing
The first phase of a mold cleanout is to identify the species of the infestation. Black mold removal will likely be more expensive than a more generic mold species. The company you hire to assess your property may take an air test or a sample test. Sample tests are more likely, especially when a more toxic species is suspected.
Mitigation
The mitigation phase can be costly, depending on the results of the tests. Certain species will require significant precautions to prevent further contamination. For example, the affected area may need to be completely sealed off from the rest of the house with plastic sheeting. Also, more protective gear may be required for certain mold species.
Mold Removal
As with each of the other phases, the cost of the removal process varies depending on the species. For more aggressive species, the process is slower. The walls and the affected space need to be wet down to minimize the risk of spreading spores. Also, depending on the size of the infestation, the removal may take days to complete.
Restoration
The restoration phase can be the most exciting for a family, but depending on the extent of the damage, it can be costly. Unfortunately, there is no way to estimate this cost without seeing the property in-person.
Mold removal is a costly process, depending on the size of the infestation. While it is tempting to perform the removal on your own, that is not the best option, especially for certain species of mold.
Watch For the Hidden Signs of a Leaky Bathtub or Shower
7/30/2022 (Permalink)
If you are like many citizens of Littleton, CO, you love to take a relaxing bath or shower. If you have a leak, however, your otherwise calming bath could turn into a nightmare. Fortunately, you do not have to wait for a shower or bathtub leak to sneak up on you.
Understanding the Consequences of a Bathroom Leak
As you probably know, bathroom leaks can cause a mess. You may not realize, though, that leaks often contribute to extensive damage inside your home. Specifically, following a bath or shower pan leak, you may notice damage to the following areas:
- Tile
- Drywall
- Fixtures
- Subflooring
- Paint
- HVAC systems
Finding Hidden Bathroom Leaks
When there is water on the bathroom floor, a leak can be easy to identify. Hidden leaks, however, often take weeks, months or longer to show themselves. As such, you must watch for some warning signs to know you may have water in place it isn’t supposed to be. Specifically, keep an eye out for the following:
- Mold growth
- Musty odors
- Floor weakness
- Stains
You may also not realize you have a shower or bathtub leak until you open your monthly utility bills. If your water bill spikes despite normal usage, you could have a hidden water leak somewhere in your home.
Repairing Water Damage
If you catch a bathroom leak immediately, you may only need to stop the leak and wipe up excess water. For leaks that last more than a few hours, however, damage may be extensive. To be certain your bathroom returns to its pre-leak condition, consider working with an experienced flood-mitigation technician. Specialists have the knowledge and equipment to identify leaks, clean belongings and repair damage.
You don’t want to ignore a shower or bathtub leak. While finding hidden leaks can be challenging, watching for their warning signs is usually worth the effort. With a bit of work, you can likely repair leaking fixtures and mitigate water damage.
What To Know About Floods: Sandbags and Other Prevention Measures
7/24/2022 (Permalink)
When preparing your Englewood, CO, business for a storm, you may be considering the use of a sandbag wall or other prevention measures. Yet there are a number of ways you can protect your property. Here are a few things you may want to know.
There Are Ways To Prevent Damage
There are several tools available to help building owners prevent flooding from damaging land and structures. These include:
- Sand bag walls
- Water-filled flood dams
- Permanent folding barriers
- Water-absorbing barriers
- Sloped landscaping
- Drainage installations
- Storm shutters
All of these things can help prevent water from getting into your property and causing damage.
It’s Important To Prepare Ahead of Time
When trying to prevent flood damage to your company property, it's important to prepare ahead of time. Doing so can allow you to acquire any tools or barriers you desire to use for your building. This may help prevent more costly damage in the event a storm does occur. You may find it useful to inspect and maintain any company property on a regular basis, as this also can help prevent further damage.
Cleanup Should Be Done Quickly
In the event your company property does suffer water damage it's important to begin the cleanup process as quickly as possible. Contacting a water damage restoration service, such as SERVPRO, can help speed this process along, as these professionals have the tools and knowledge needed to restore water damage before it causes additional problems.
When preparing your company property to handle a storm, it's important to prepare ahead of time. The use of a sand bag wall or flood dam can help prevent flood water from pooling around the building. If you do end up with flood damage, and it's important to take care of it as quickly as possible. If you have any questions, a professional might be able to help.
3 Signs of Potential Hail Damage to Your Home’s Roof
7/11/2022 (Permalink)
Hail Damage To Your Home's Roof
After a storm that involves hail in Southglenn, CO, it’s common to check for damage on cars, but people often forget to check for hail destruction on the roof. There are several signs to look out for that may indicate that your home has a hail-damaged roof.
1. Dents or Cracks in Shingles
The most apparent sign of roof damage from hail can be found on a home’s shingles. Depending on the type of shingles in your home, your shingles may have dents, cracks, or pieces missing as a result of a hailstorm's impact. It can be harder to visibly identify damage in an asphalt roof due to the material, whereas a roof with wooden shingles will show more obvious impairment.
2. Damage to Your Home’s Siding
Although busted shingles show obvious signs of a hail-damaged roof, other exterior areas of your home can also be an indicator that you have hail damage on the roof. If hail impacts other parts of your home, it’s likely that the hail was sizable enough to impact your roof too. Like shingles, siding that is injured can look cracked or dented, but siding can also be loose if it has been beaten up.
3. Gutter Damage
It’s important to examine the gutters on your home after a storm since they are close to your home’s roof and can therefore give you an idea of what to expect on your roof. Dinged gutters may appear dented or split, or the gutters themselves may sag. If you notice that your gutters have been compromised, it’s probably a good idea to also check your roof for any hail damage.
It's helpful to know the signs of a hail-damaged roof so that you can make necessary repairs and prevent further harm from occurring. If your home has been marred by hail, it is wise to contact storm damage restoration professionals who can help you with hail damage repair.
Protecting Your Home From Flooding
6/30/2022 (Permalink)
 A flooded home in Park Meadows, CO.
Flood Safety
As a homeowner in Park Meadows, CO, you want to keep your home safe from dangers and natural disasters. Flood safety is one of the things to consider to protect your family and your property. Ready.gov reports that flooding is the most common natural disaster in the United States. Here are some safety tips for incorporating into your plan.
1. Examine your home's water valves.
Flooding doesn't always mean rainwater building up in your living room—many homes flood when sewer systems back up. The best way to address this risk is to install an interior or exterior backflow valve. Gate valves, specifically, are an excellent choice, though they are more complex and operated by hand. Install valves on all pipes coming into your home for maximum flood safety protection.
2. Flood proof your electrical and heating systems.
Check all of your electrical outlets, switches, wiring, and breakers to ensure they are at least a foot over the level you expect floodwaters to reach. Similarly, your furnace and water heater should sit at the same level or higher to avoid storm damage.
3. Study how water flows around your home.
The slope of your property carries water around your home in a particular pattern. Ideally, the grading of the ground moves the water away from the house rather than toward it. To understand your flood safety risk, pick any rainy day and watch how the water flows. Take note of any areas where water may accumulate in the street and backflow onto your property. Contact the planning department in Park Meadows, CO, to request their help with this kind of stormwater runoff.
3. Tie down your outdoor equipment.
If you have outdoor equipment such as fuel tanks, HVAC units, or generators, ensure they are anchored securely higher than the expected flood level. Without sufficient anchoring, these pieces can break loose and damage your property. Also, a waterlogged generator can malfunction and fail when you need it most.
How to Resolve 3 Common Toilet Issues
6/22/2022 (Permalink)
3 Common Toilet Issues and How to Fix Them
Every business in Cherry Hills Village, CO, has toilets available for use by employees and sometimes customers. If there are complications, such as toilet overflow, getting your toilets back up and running right away is essential. Here are some steps to resolve three common problems:
- clogged toilet
- overflowing toilet
- constantly running toilet
Unclog a Toilet
The most common way to unclog a toilet is by using a plunger. Be sure to wear rubber gloves. Ensure there is enough water in the bowl to cover the plunger head to get a better seal and remove the clog quickly.
Stop an Overflowing Toilet
Turn off the water and investigate the cause of the toilet overflow. Most of the time it is due to a clog, so follow the previous steps. Turn the water back on. Contact a water cleanup company to ensure your building does not suffer additional damage from the toilet flood.
Stop a Toilet From Flushing Constantly
Nothing is more annoying than having a toilet flush all the time. Surprisingly, it is usually an easy fix. Since most Cherry Hills Village, CO, companies have tankless toilets, here are steps to address constant flushing in this type of toilet.
Turn off the water to avoid toilet overflow by tightening the screw on the side. If there is a cap on top of the screw, pop it off.
Put a piece of paper over the lid on top to avoid damage. Then, loosen the cap with a wrench. Unscrew the rest by hand. Open the flange cover. Beware of water.
Remove the gasket. Clean off the sediment. Stick a small piece of wire through the weep hole to be sure it is not plugged.
Reverse the steps to put everything back together.
Using these tips can save you money and avoid downtime when toilet issues strike. It will make your employees and customers happy, too!
How To Prevent Basement Floods
6/16/2022 (Permalink)
Five Causes of Basement Floods
A basement flood can cause severe harm to your house and necessitate water damage cleanup services. Luckily, there are some things you can do to limit this type of loss. Here are five common causes of basement floods and how to prevent them.
1. Clogs
Your property likely has a manifold that connects your house to the local sewer system. If the manifold clogs, your property could flood. The water could even destroy the foundation of your home. If you suspect there is a blockage in the gutter system, contact authorities in Centennial, CO, right away.
2. Poor Drainage
Ideally, the downspouts of your drainage system should be more than six feet away from the basement. They also should drain away from the basement rather than toward it. If necessary, have a plumber fix the downspouts so any excess water flows into your yard or the street.
3. Improper Home Location
Even just the site of your house can cause a basement flood. Homes are supposed to be constructed on a slope so water can drain properly. However, if your property is at the bottom of a hill, the fluid could flow right into your basement. Luckily, you do not have to move to solve this problem. Erosion should level any slopes near your house over time.
4. Blocked Roof Gutters
The gutters on your roof can fill with debris. Leaves and snow may block rainwater, causing an overflow of liquid and a flooded basement. You should thus make sure your eavestroughs are cleaned regularly. If the gutters still get clogged, consider purchasing larger gutters that can better handle local storms.
5. Poor Sealing
Water can seep through gaps between the tiles and create a basement flood. Have the seals checked regularly and fix them if necessary.
By properly maintaining your home's gutters, you can reduce the number of floods in your basement. You may also want to contact local professionals who can fix your drainage system or remove major clogs in your pipes.
What Should I Throw Away After a Fire?
5/23/2022 (Permalink)
After a Fire, What Should I Throw Away?
After you've had a fire in your Greenwood Village, CO, home, many of your belongings can be damaged by smoke, water and heat. Some items may be obviously ruined, but you might be wondering whether to throw away other things that don't have visible signs of damage. You should still discard certain household items after a fire for safety reasons.
Room-Temperature Perishable Food
It's possible to save refrigerated food after a home fire. If the refrigerator stayed tightly closed and did not sustain fire damage, the food inside should be safe for about four hours without power.
Check inside an intact refrigerator and evaluate the condition of the interior. Discard any food that:
- Has a strange smell or color before or after preparation
- Was above 40 degrees for more than 2 hours
- Was frozen but no longer has ice crystals in it
- Has the smell or appearance of smoke
Damaged Nonperishable Food
While cans of food may remain intact after a fire, it's best to throw away anything that was near the flames. High heat can cause the food inside to spoil or taste bad, and fumes can penetrate sealed cans or glass containers. Any food with apparent signs of damage or exposure, like rusted and bulging cans or containers covered in extinguisher dust, should be discarded immediately.
Cosmetics and Medicine
It may be hard to discard expensive medications, but if they show any signs of fire damage, it's safest to get rid of them. Call your doctor right away if you need to replace prescription medication. Inspect cosmetic packages for signs of exposure to high heat, like warped packaging or a smoke smell.
A professional fire restoration company can help you sort your belongings and determine what is salvageable and what should be discarded. When it comes to consumable items, it's best to err on the side of caution when deciding what to throw away after a fire in Greenwood Village, CO.
Repairing Smoke-Damaged Contents
5/21/2022 (Permalink)
Content Cleaning After a Fire
If your Littleton, CO, business is damaged in a fire, you have more than the structure to worry about. Unfortunately, the materials in the building are also likely to be damaged. An experienced restoration service can help you with content cleaning and repair. Although dry-cleaning is one of the most common methods, there are a variety of options available.
Cleaning
Your business likely has a mix of porous and non-porous items that must be cleaned after a fire. Some items will be covered in soot, and others may have water damage from the extinguishing efforts. The specific approach should be tailored to the individual item, but some common techniques include:
- Dry-cleaning
- Abrasive cleaning
- Immersion cleaning
- Foam cleaning
The faster cleanup begins, the less likely the items are to suffer permanent damage. Mold growth can begin within 24 hours when an item is wet, so it is important to start the cleanup process as quickly as possible.
Repairing and Replacing
Unfortunately, dry-cleaning and other cleaning techniques are not enough for some items. These objects require more intensive restoration methods, such as replacing damaged parts and re-covering surfaces. Other items are not salvageable and must be replaced. Professionals can help you determine what can be repaired and what needs to be thrown away.
Storing
A good restoration company will provide content storage along with cleaning services. Storing items off-site allows more room at the building for big cleanup jobs and structural repairs. Climate-controlled storage is an ideal solution for the contents of your commercial building. Make sure you feel comfortable with the storage area before your belongings are moved. Ask about retrieval policies and what happens if your items are damaged at the storage location.
Business documents and other contents are very important for the survival of the business. If these items are damaged in a fire, the results can be catastrophic. Fortunately, the technology exists to restore many of these items to preloss condition.
The Right Steps To Flush a Water Heater
5/16/2022 (Permalink)
How to Flush a Water Heater Properly
Like any appliance, a water heater requires consistent maintenance and upkeep. However, if you do not take care of it, its lifespan and effectiveness will diminish. Flushing water heaters is one of the best ways to keep them running correctly. By following these four steps, your family can enjoy hot water in your Englewood, CO, home anytime you need it.
1. Shut It Off
Never do a water heater flush if the unit is still on. For a successful, safe process, shut off the appliance. If it is an electric model, shut off the line on the circuit breaker. If it is a gas-powered model, turn off the gas so you no longer see the pilot light on.
2. Connect the Hose and Drain the Unit
Next, connect a water hose to the drain valve and run the other end of the hose to a drain. You should then open the valve and let the water run for several minutes. To help the water drain quickly and without difficulty, turn the faucet on in the kitchen. Then, turn off the main water supply. Once the water has stopped completely, turn on the valve again.
3. Run Water Through the Water Heater Again
At this point, all the water and sediment should have drained through the unit. You should then close the valve and turn on the water supply. Once the water steam is clear and uninterrupted, you know that tank is once again full.
4. Restore the Power
Once the tank is full of water again, you can safely turn the power back on to the unit. Shut off the kitchen faucet as well. After you've followed these steps, you will have successfully flushed the water heating appliance in your Englewood, CO, home.
Poor water heater maintenance can lead to flooding in your house. A professional water cleanup team can help tackle this problem. But to avoid it and to keep the heater doing its job correctly, a flush will make a significant difference.
Increase Your Business's Thunderstorm Safety With These Tips
4/26/2022 (Permalink)
These Tips Will Help Your Business Stay Safe During Thunderstorms
Your business in Southglenn, CO, can be at risk during a rainstorm. Powerful winds, excessive precipitation and strong lightning can endanger the building and anyone inside. It is possible to prepare for this weather by establishing the proper measures before disaster strikes. Consider the following safety tips to protect your establishment.
1. Inform Employees of Safety Procedures
The safety of your employees is crucial during these situations, so they should know what to do when a thunderstorm arrives. Assemble a task force and create a plan that considers the responsibilities and needs of your staff.
Share this information with the employees so that they can behave appropriately during a storm. For example, they should avoid using landline phones and electronic equipment, using battery-powered alternatives instead. Ask them to meet at safe spots that are away from glass doors, windows and anything else that can shatter.
2. Install and Maintain Lightning Rods
Lightning rods are useful during a rainstorm since they ground any nearby lightning, preventing it from damaging your property. If you do not have a lightning rod, consider installing one with the guidance of the local fire department. This will ensure the system complies with all safety standards. If you already own such equipment, you can still maintain it to ensure it is in working condition when a storm occurs.
3. Control and Trim Trees Near the Facility
Trees present a major hazard to your commercial building, especially in the middle of a thunderstorm. The high winds can knock them towards other structures, damaging property and necessitating storm damage restoration. Lightning that strikes a tree can start a fire that can spread to other trees or the building itself. Avoid this issue by trimming trees enough so that they do less damage. If possible, keep trees at a reasonable distance from your building.
The impact of a rainstorm is not easy to avoid, but there are ways to mitigate it. Follow these safety procedures to reduce risks.
3 Ways To Conserve Water
4/16/2022 (Permalink)
Three Water-Saving Techniques
Water issues in your community may have you looking for ways to cut costs and conserve water at your business in Park Meadows, CO. Not only is this good business sense, it's good for the environment, but it can be hard to know what to do. Here are three ways to conserve water.
1. Replace Faucets
Especially in a large office building, a lot of water gets used in bathrooms and kitchens. One water upgrade that will actually lower your monthly bills is to install touch-free faucets. The initial cost may be high, but the faucet won't be left running by a forgetful employee, and the upgrade will pay for itself over time. A less costly option is to replace the aerators on your faucets. Lower pressure means less water consumption. Hands still get clean, but you can save gallons of water.
2. Manage Irrigation
When does your irrigation schedule change? If the answer is "Never," it's an easy fix that will definitely save money and conserve water. There's no need to run the irrigation system during the rainy season. Even in dry seasons, you may not need to run the irrigation for as long as you think. The best way to decide this is to sub-meter your irrigation system so that you can see exactly how much water is being used for the plants. Try running the irrigation for ten fewer minutes at each session. If your plants don't die, you've found a way to save.
3. Check for Leaks
One major source of costly water issues is invisible leaks. There may be a single toilet in the building that runs all the time or a pipe deep in a wall that has developed a leak. If your water bill begins to creep up inexplicably, call a water damage restoration specialist to inspect your building. If they discover a leak, they will talk you through the process of getting it repaired, saving money and conserving water.
You care about the water issues in your community, your bottom line, and the environment. These tips can save money and conserve water for the benefit of your company and the community.
4 Ways to Minimize Mold Growth in a Vacant Rental
4/11/2022 (Permalink)
Mold Prevention
As a property owner in Cherry Hills Village, CO, there are always times when a rental is sitting empty. While, hopefully, that doesn’t last long, even a short time may result in unwanted issues. Mold prevention should always be a top priority. It only takes a little bit of excess moisture to bring mold spores to life. Below are four ways to avoid having to call a mold remediation and restoration specialist
1. Conduct Regular Inspections
The key to battling mold is finding it before it can spread. If there has been recent rain or other precipitation, inspecting the property is essential. Common areas for growth include attics, basements, and plumbing pipes and fixtures.
2. Turn the Water Off
Since mold loves moisture, the best mold prevention tip is to eliminate any potential sources. Turning off the water to the property will ensure that happens, as well as minimize the potential for a pipe burst. It is also important to ensure toilet tanks and bowls are empty to avoid mold growth. Before turning the water off, consider having an inspection done to find any potential leaks. Once the property is no longer vacant, the last thing you want to deal with is a plumbing issue.
3. Monitor Humidity Levels
If the humidity is high and there is hidden water damage, you can expect to have a fungus problem. Leaving the heat or air on, which will depend on the weather conditions, will make it easier to keep humidity levels below 60%. If the levels are difficult to maintain, it may be worth investing in a dehumidifier or upgrading the HVAC system with a dehumidifying option.
4. Consider Using Mold-Resistant Materials
After a tenant moves out, it creates a prime opportunity to upgrade the property. If you have experienced mold issues before, there are materials available designed to resist and prevent that from happening, such as primers and water-resistant wallboard.
Although mold spores may be everywhere, adding mold prevention to your to-do list can minimize the chances of them coming out of hibernation.
How To Make a Flood Insurance Claim in 3 Simple Steps
3/31/2022 (Permalink)
How To Make a Flood Insurance Claim
Starting cleanup efforts when a flood impacts your Greenwood Village, CO, home can be daunting. You may not know where to begin or how to go about draining away standing water. However, you can start the process by making a flood claim to your local insurance company so you can be compensated for damages as soon as possible. If you have never made such a claim before, there are a few simple steps you can take right away.
1. Take Photos of the Damage
Before you begin cleanup, take photos of all the water damage so you can send them to your insurance agent, whom you should contact right away. Remember to take this step only if it is safe to enter your home after a flood. Avoid immersing any part of your body in water that could be contaminated and use your zoom lens to take photos from a safe distance until the water can be drained away.
2. Do Not Wait for the Insurance Adjuster
Waiting for your insurance adjuster to arrive so you can make a claim may cause further damage to your home. This can be especially true if outdoor flooding has affected multiple homes on your block, as it may take the adjuster several days to reach you. In the meantime, have water drained so the drying process can begin, as this can reduce the chance of mold growth.
3. Set Aside All Damaged Items
If you call in flood damage and restoration service to help you after a flood, it is a good idea to ask them about which of your items can be restored and which you will have to list in your flood claim. Avoid throwing any belongings away until they can be examined by your flood techs, as this can make the filing process simpler when the time comes to claim the value of lost items.
Making a flood claim after your Greenwood Village, CO, home suffers water damage can be confusing. However, when you know which steps to take right away, you may have greater peace of mind when it comes to being properly compensated for your losses.
Tips for Getting an Accurate Restoration Estimate
3/24/2022 (Permalink)
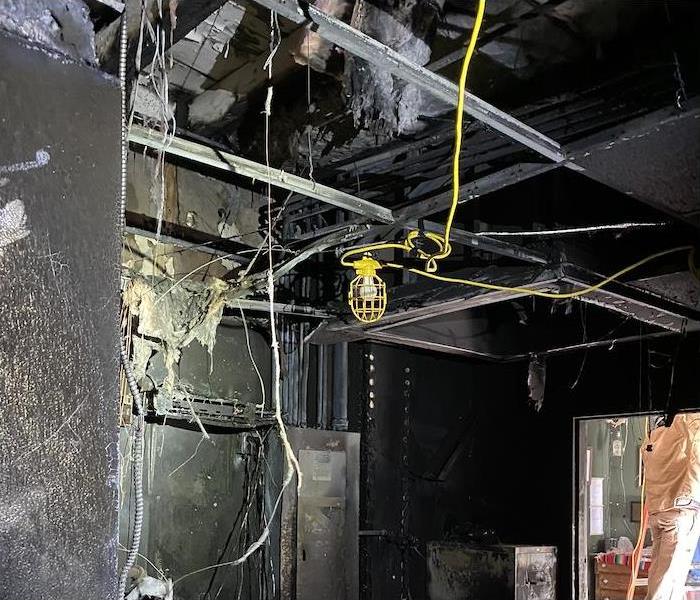 Severe fire damage in Englewood, CO.
How to Get a Reliable Restoration Estimate
After your commercial building has been affected by fire, how much will it cost to have affected areas repaired and reconstructed? You need to act fast in obtaining fire damage restoration services if you want the best results. With this in mind, some of the most important things you can do are getting an estimate concerning reconstruction costs and contacting your insurance company.
Your First Course of Action
There are four steps to restoring your property after a commercial fire.
- Contact emergency professionals, from the fire department to fire damage remediation experts.
- Apply tarps to seal the holes in the roof or walls.
- Assess the extent of the damages throughout your property.
- Cleanup and rebuild the damaged building.
An estimate is generally provided during the assessment step. The detailed document should include all of the services and work expected. A coordinator will keep a file on the job, communicating with insurance professionals, and other officials who may be involved.
Work Closely With Project Managers
Most of the work in coming up with an estimated cost of recovery is completed by the damage remediation professionals, but there are some steps you can take to increase the accuracy of that approximation:
Keep clear records and store documents where they can be accessed easily.
Take pictures and write notes describing the damage.
Communicate often and clearly with remediation professionals.
Designate one person from your company to act as a liaison with all other professionals.
Project managers from the remediation company may contact you often to discuss what needs to be cleaned, removed, replaced, repaired, or completely rebuilt. These experts are the people most likely to provide the quotes you need to move forward with recovering from the fire.
Get Quotes Quickly
How much can you expect to pay when recovering from a commercial fire in Englewood, CO? For quick, accurate results, work closely with your insurance agents and your restoration company, maintain organized records, and keep clear lines of communication open.
Does Your Commercial Building Have These 4 Common Problems?
3/7/2022 (Permalink)
Do You Have These 4 Common Issues in Your Commercial Building?
Think about the last time you had your business plumbing inspected. For most buildings, the answer can be years. Considering you should have your plumbing inspected every 6 months, this is not a good thing. Regular inspections can help catch common issues like a blocked sewer line before they become serious problems. Here are some other common problems that occur in commercial buildings.
1. Leaking Toilets
While a blocked sewer line may seem like the worst possible option, leaking toilets can actually be a lot worse. One leak can waste thousands of gallons of water per year. Whether the leak is due to a problem with the handle or the flapper, it can go undetected for a long time because any extra water will be flushed down the drain. Therefore, it is important to have your toilets checked by a plumber regularly.
2. Low Water Pressure
Another thing that is worse than blocked sewer lines is low water pressure. The most common reason you experience pressure problems is a lot of small leaks in your water line. Each leak in your system lets out a little bit of water and reduces the pressure that comes out of your faucets. This is inconvenient, and it can do tons of damage and require a water restoration company.
3. Clogged Toilets
Clogs happen when improper objects are flushed down your toilets. For large buildings, it is important to inform your employees what can't be flushed. Forbidden items include wet wipes and tissues. In fact, pretty much anything that isn't waste or toilet paper will get stuck inside your pipes. If this happens, you will experience a toilet overflow.
4. Clogged Parking Lot Drains
Sometimes, the parking lots in Centennial, CO, back up after heavy rains. This usually happens because the parking lot drains are clogged with leaves, trash, and branches. Make sure to clear these away from drains so water can flow out of your lot and into the sewer system.
It is important to have your building regularly inspected to check for these common issues. If left untreated, pipe breaks and other problems will only become worse.
Four Steps to Take When Filing a Water Damage Claim
2/21/2022 (Permalink)
When Filing A Water Damage Claim, There Are Four Steps To Follow.
Experiencing water damage in your Littleton, CO home can be a stressful situation. Filing an insurance claim can add to the frustration you are feeling, if you are unprepared. Following these steps can make the process go more easily for you.
1. Call Your Insurance Agent
The first thing that you should do is relocate to a safe area if the damage to your home is significant. After this, call your insurance agent. Getting in touch with your insurance company as soon as possible will allow the process to be started more quickly. It also prevents the company from denying your claim because you waited too long to report the damage.
2. Take Pictures of the Damage
Before you begin moving anything, you should take pictures. This will help during the insurance claim process because you will be able to show your agent the extent of the damage to your home. Be sure to include photos of the structure of your home as well as any damaged property and belongings.
3. Take Steps to Prevent Further Damage
If there is a flood of water in your home, your insurance company will expect you to take care of your house and do what you can to reduce any further damage. If they find that you have not done so, it may affect your claim.
4. Make a List of Lost Items
In order to file your insurance claim and be properly reimbursed, you will need to supply your insurance agent with a list of items that have been damaged. A professional remediation service can help in this area by determining which items can be salvaged and which must be replaced.
Whether a pipe burst in your home or the water damage has come from another source, it is important that you begin the claims process right away. Waiting too long can add unnecessary complications and might result in a lower amount of financial compensation.
What Happens During the Fire Cleanup Process
2/21/2022 (Permalink)
 If you experience a fire or water loss, our team is always ready to go. 24/7, 365 days a year! Call SERVPRO, we are faster to any size disaster
What Happens During the Fire Extinguishing Procedure?
If your Englewood, CO, home has been damaged by a fire, contacting a remediation service is a good idea. They can professionally remove fire and smoke damage from your home and help get everything back to the way it was before the incident. One crucial part of restoring your house is cleaning up your home and any damaged belongings.
1. Removing Soot From Your Home
The first part of the cleanup process will be removing any soot from your home. Soot consists of carbon particles that are created during a fire and will likely cover walls, floors and items near where the fire occurred. A fire restoration service will be able to clean and remove the soot damage from the structure of your home.
2. Cleaning Your Belongings
Some of your belongings may have fire damage that makes it difficult to save or restore them, but others might only have smoke damage that can be removed. Any items that can be salvaged will be cleaned during the restoration process to return them to the condition they were in before the fire.
3. Removing Smoke Odor From Your Home
Once all of the soot has been removed from the home and your belongings have been restored, smoke cleaning will be performed to remove any remaining odors. Smoke has a strong smell that can linger in your home after a fire, but fogging equipment and industrial air scrubbers can be used to get your home smelling clean again.
After a fire, it is important that you call a professional service to perform the cleanup process for you. Depending on the size of the fire, there can be quite a bit of smoke damage that can be difficult for you to remove on your own. A fire restoration company will have the proper training and equipment to return your home to its prior condition.
Building a Reliable First Aid Kit for Your Business
2/21/2022 (Permalink)
5 Qualities A Tenant Looks For In A Good Landlord
Having a first aid kit on hand in your business at all times is a must. However, that doesn’t mean you can stick with any old kit that you find lying around. In order to meet legal standards in Greenwood Village, CO, as defined by OSHA, your kit must include a number of specific items, including:
- 4x4” gauze pads
- 2 larger gauze pads, each measuring 8x10”
- Adhesive bandages in a box
- 2” wide packaged gauze roll
- 2 triangular bandages
- Wound-cleaning supplies, such as moist towelettes in sealed packages
- A pair of scissors
- A blanket (at least one)
- Tweezers
- Adhesive tape
- A pair of latex gloves (consider non-latex alternatives as well, in case one of your employees is allergic to latex materials)
- Resuscitation equipment such as a pocket mask
- 2 elastic wraps
- A simple splint
- A thorough set of directions on calling for and requesting the assistance of emergency service.
Furthermore, you’ll need more than one of these emergency kits to keep your workplace up to OSHA’s code. The 15-item first aid kit highlighted above is built to accommodate two to three people, meaning you’ll need several more kits on hand if you have significantly more employees.
Furthermore, each kit is placed on a per-workspace basis. If you have multiple operations occurring across your commercial spaces, you’ll require more kits regardless of how many employees you have working in each space at any given time.
Your employees are what keep your business moving forward year round, and you should be ready and able to offer them the care they require in the event of an emergency. Building a proper, OSHA-approved first aid kit may not completely solve every emergency situation, but it helps to set standards and build a good foundation for workplace safety for years to come.
How Tarps Help Mitigate Damage From a Fire
1/28/2022 (Permalink)
Tarp Services
A fire in your commercial building in Park Meadows, CO, can be a devastating experience. Even minor fires can have a drastic effect on you emotionally and financially. Larger fires can be life altering. Recovery isn’t easy, but there are ways to salvage parts of your property as well as your precious belongings inside. Fire cleanup is an important and intricate part of recovering. The fire department and other agencies will begin roof repair and will assess other damage to your property. One thing to focus on as well is tarp services. Placing tarps over your roof and other parts of the property will help prevent further damage.
1. Tarps will keep the rain and snow away. Firefighters use a lot of water to put out fires. When they took care of your commercial building fire, they likely damaged parts of your property as well as your possessions inside. Fire cleanup will help mitigate some of this damage, but tarp services will provide further assistance. When you place tarps over your damaged property, you’ll keep out more moisture from rain and snow. These elements would otherwise cause even more damage to the flooring and structural components of your building in Park Meadows, CO.
2. Tarps will keep out the wind. When a fire has damaged your roof and you’re waiting for roof repair, your facility will become vulnerable to wind as well. High winds could cause problems in your property and potentially worsen conditions inside. The wind might even compromise evidence to help determine how the fire started.
3. Tarps can keep people out. It’s unsafe for unauthorized people to enter a facility following a fire. Tarps will tell people to stay away and that conditions are not ideal for coming inside. These are a quicker and less expensive option than boarding up windows and open areas.
Part of your fire cleanup efforts should include using tarp services. This will help during roof repair and other restoration.
3 Ways To Manage a Minor Mold Problem
1/28/2022 (Permalink)
Three Ways To Manage a Minor Mold Problem
A homeowner can take steps to stop mold growth and clean up existing colonies. A DIY effort is only advisable for minor infestations that involve less than 10 square feet of visible mold. If mold is hidden in carpet padding, behind wallpaper, or in wall cavities, homeowners should hire remediation professionals. Here are three ways to manage a minor house mold infestation.
1. Choose a Cleaning Treatment
Homeowners do not necessarily need to apply harsh cleaning treatments to superficial mold. There are several mild and effective solutions:
- Scrubbing with water
- Household cleaners or soaps
- Solutions for specific materials
Decide which treatment to use based on the material covered in mold. Some porous materials such as carpet or drywall may need to be torn out and replaced.
2. Change the Conditions
House mold thrives in moist conditions with a source of nutriment and little disruption. Several adjustments can make an environment less hospitable for fungi:
- Fix leaks or eliminate water sources
- Increase ventilation
- Run a dehumidifier
Reducing moisture levels will discourage mold growth. Most mold remediation experts recommend maintaining humidity levels between 30 percent and 50 percent.
3. Look for Signs of a Larger Problem
A homeowner cleaning up a seemingly minor mold infestation may realize that the problem is more extensive than he or she initially thought. If more than 10 square feet or affected, it is a good idea to rely on the expertise of a mold damage remediation company. Trained professionals can determine which species of mold are present, the extent of the infestation, and the most effective remediation method.
These are three ways to stop house mold from growing at a residence in Southglenn, CO. If a minor mold problem involves any hidden mold, it can be advisable to have remediation work done by professionals to limit risk and ensure that the problem is not more serious.
How To Limit Damage to Your Home’s Roof After a Storm
1/12/2022 (Permalink)
After a Storm, Here's How to Keep Your Roof From Getting Damaged
When your home’s roof is functioning properly, you may not give it much thought. If it springs a leak or sustains other damage, though, your roof can be impossible to ignore. Few things can destroy a roof faster than severe weather. If your house has survived a hurricane, tornado, thunderstorm, blizzard, or another weather event, consider taking the following steps to mitigate roof damage.
1. Use Tarps To Prevent Water Damage
The roof on your Cherry Hills Village, CO, home must be watertight. During high winds, shingles and other important components may dislodge or break. If your home has sustained wind damage, weeks may pass before you can schedule a repair. During this time, water can damage walls, insulation, carpeting and personal belongings.
Fortunately, there is a cost-effective solution. Simply cover damaged roofing with a tarp. Be sure to secure the tarp in several places to avoid both leaks and pooling water.
2. Rely on Boards To Cover Large Holes
During severe weather, entire sections of your home’s roof can sustain damage. If you have large holes in your roof, tarps are probably not sufficient to protect your house from further roof damage. Instead, you may need to use boards. The best approach is to use a 4x8 section of plywood or other lumber. You can nail these boards directly to your existing roof. You may then want to cover them with tarps for a watertight seal.
3. Find a Restoration Service Immediately
Mold and mildew can grow quickly. As you probably know, these fungi can destroy the comfort, appearance and value of your house. Unfortunately, the longer you wait to contact an emergency restoration service, the worse damage may become. As such, ask a reputable specialist to perform an assessment as soon as you can.
Roof damage can lead to significant problems inside and outside of your home. Instead of leaving your home’s condition to chance, work to mitigate damage after severe weather.

 24/7 Emergency Service